Quick Start
If you are planning to deploy a new VPC network secured by egress filtering, think about the IP address ranges you would like to deploy. A good place to start is the Virtual Private Cloud (VPC) network overview page over at Google Cloud documentation.
Whether something wholly new or the default network, just follow the visual guide below.
Contact us for expert help at devsecops@chasersystems.com at any stage of your journey – we'll jump on a screen-sharing call right away!
i. MARKETPLACE LAUNCH
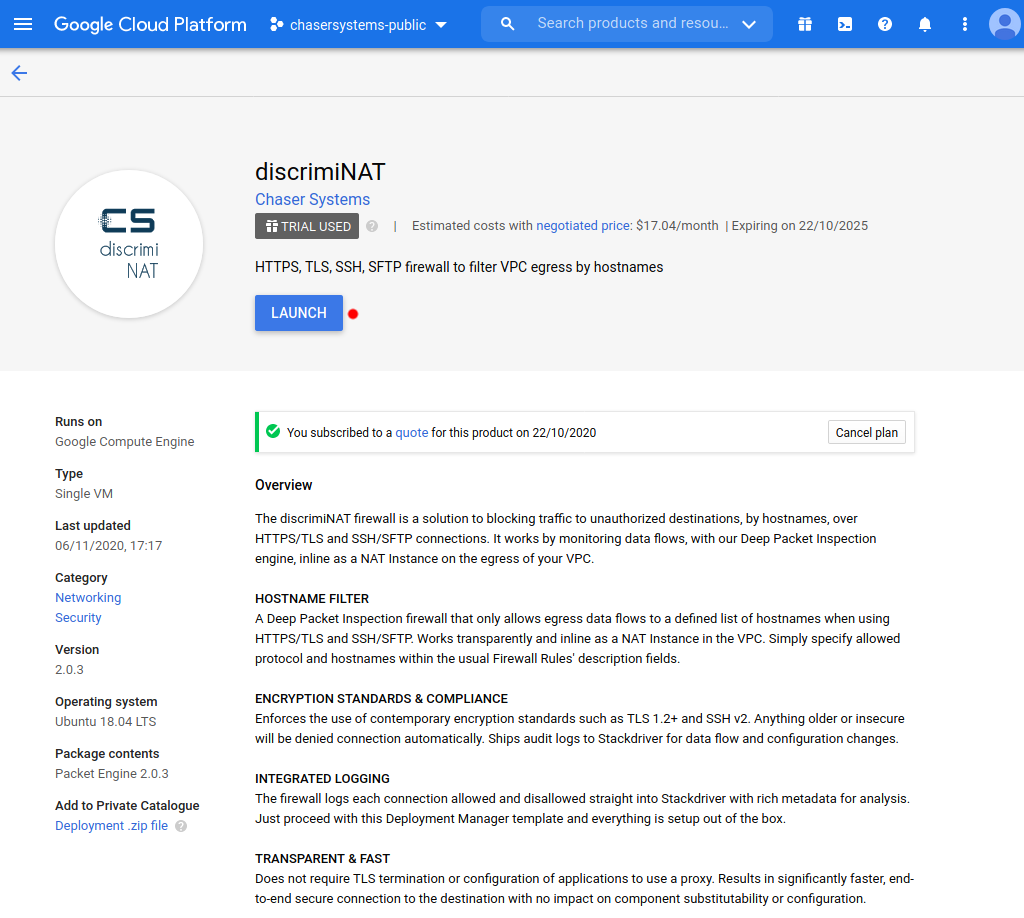
Proceed to our Google Cloud Platform Marketplace page and click the Launch button. This step is entirely self-service.
If you have deployed through Terraform or are considering, jump straight to the Key Information section. You may skip everything before that.
ii. DEPLOYMENT PARAMETERS
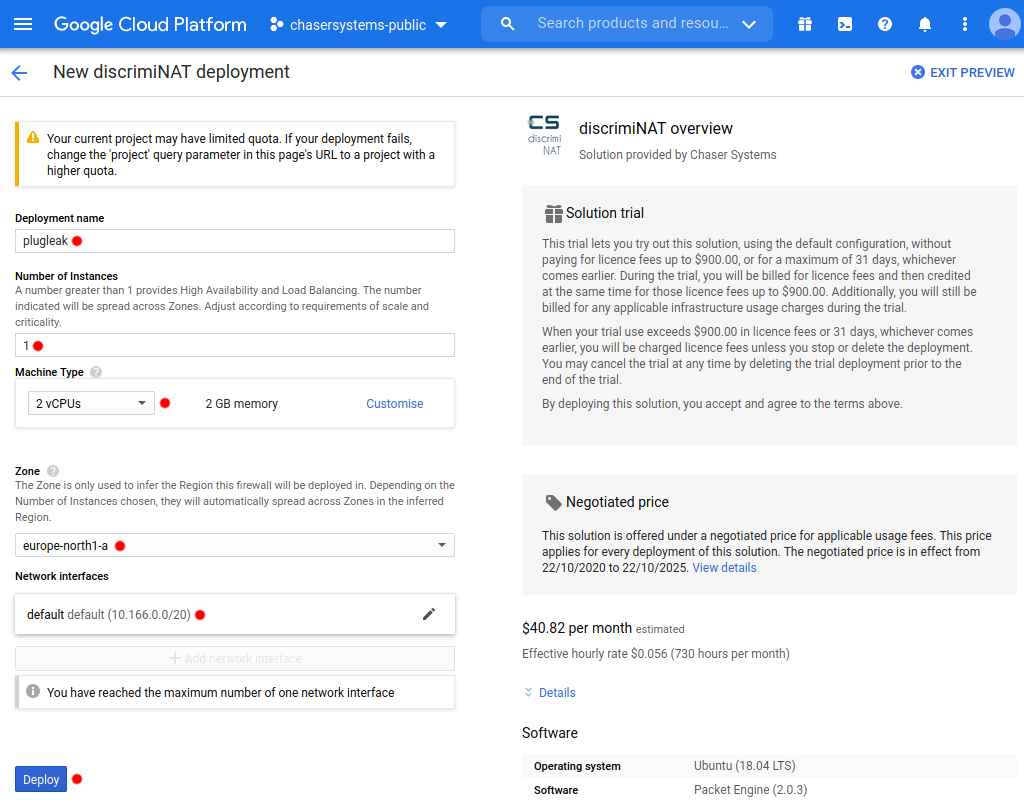
At the deployment configuration page, the defaults should suffice for a non-Production environment. The parameters are explained below for help with multiple deployments and considerations for Production environments.
Deployment name: This is a unique identifier for the deployment. In the case of this example, we have chosen the name plugleak.
Number of Instances: This many number of instances will spread evenly over all Zones in the selected Region. A number of 1 should suffice for non-critical environments such as those for Test & Development purposes. For Production, a number of at least 2 will provide rapid High Availability. A number equal to the number of Zones in the selected Region will provide a nice, even spread of the instances in all Zones and sufficient headroom for baseline Production throughput in case of an incident.
Machine Type: A machine type with at least 2 vCPU and 2 GiB RAM. An e2-small should suffice where throughput requirements are basic and allowlists small. Otherwise an n2-highcpu-2 makes a good choice for constant throughput. Talk to our DevSecOps to get the sizing right!
Zone: The Zone is only used to infer the Region for this deployment.
Network: This is the VPC Network for this deployment. The VM Instances that you wish to protect (filter the egress traffic of) would have to be a part of this VPC Network.
Subnetwork: This is the Subnetwork for this deployment. The VM Instances that you wish to protect (filter the egress traffic of) would have to be a part of this Subnetwork.
Just hit Deploy and the firewall instance(s) will be ready in a few minutes!
iii. SMALL WAIT
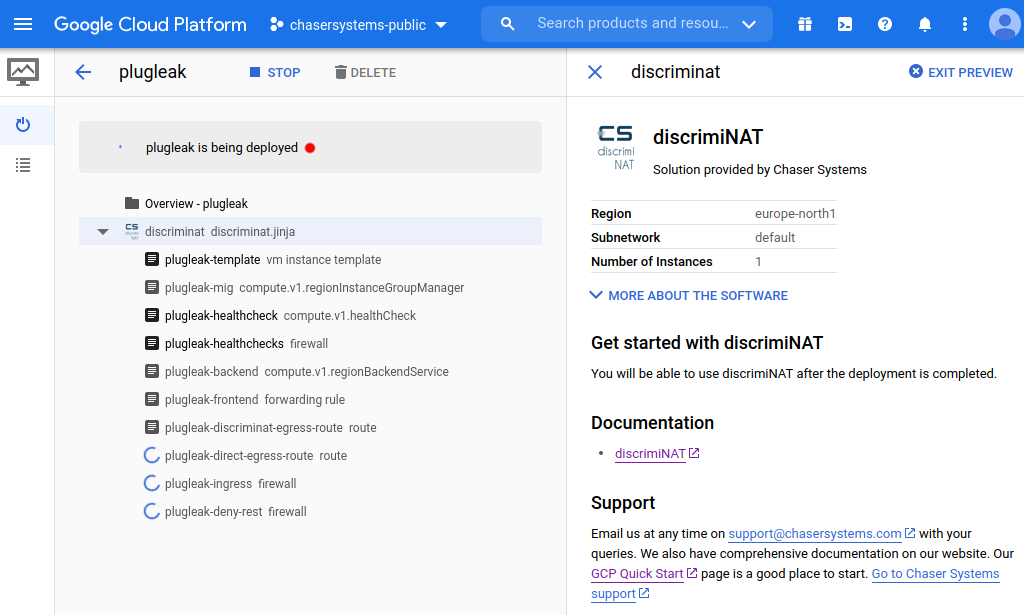
Shouldn't be more than a few minutes.
iv. KEY INFORMATION
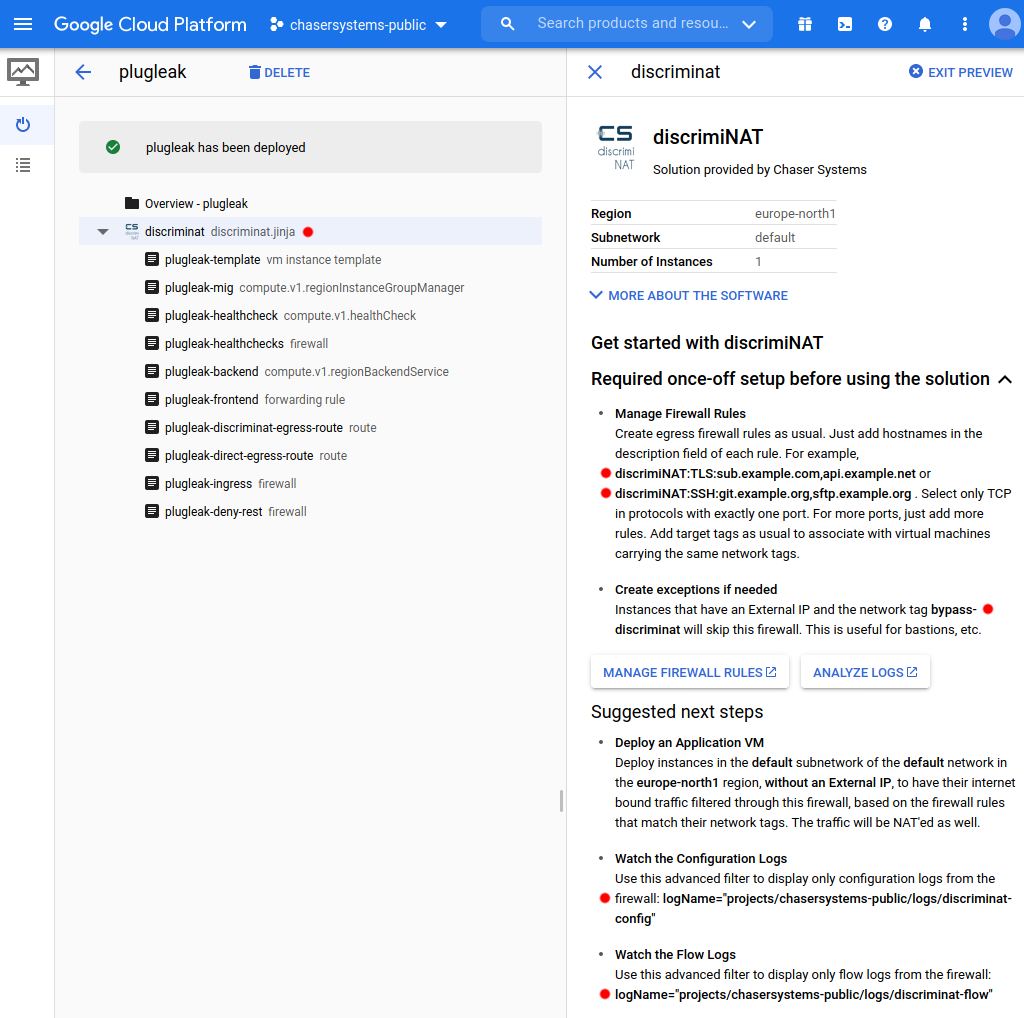
You're all set! Let's review some key information that is now visible:
Manage Firewall Rules: Brief example of what could be specified in the firewall rules now this firewall is deployed. More on that in the next section.
Tag for bypassing firewall: This tag, bypass-discriminat, is what can be added to the network tags of any virtual machines if you would like them to simply side-step this firewall.
Watch the Configuration Logs: This string is useful to directly filter for logs, in StackDriver, that reveal any changes to the firewall configuration. It is always constructed as logName="projects/<google-cloud project name>/logs/discriminat-config" .
Watch the Flow Logs: This string is useful to directly filter for logs that reveal traffic metadata for all accepted and rejected connections through the firewall. It is always constructed as logName="projects/<google-cloud project name>/logs/discriminat-flow" .
v. FIREWALL RULES
Don't know which FQDNs to allow?
Watch our 3½ minute video on how to build an allowlist super quick with DiscrimiNAT's monitor mode!
Contact us for expert help at devsecops@chasersystems.com at any stage of your journey – we'll jump on a screen-sharing call right away!
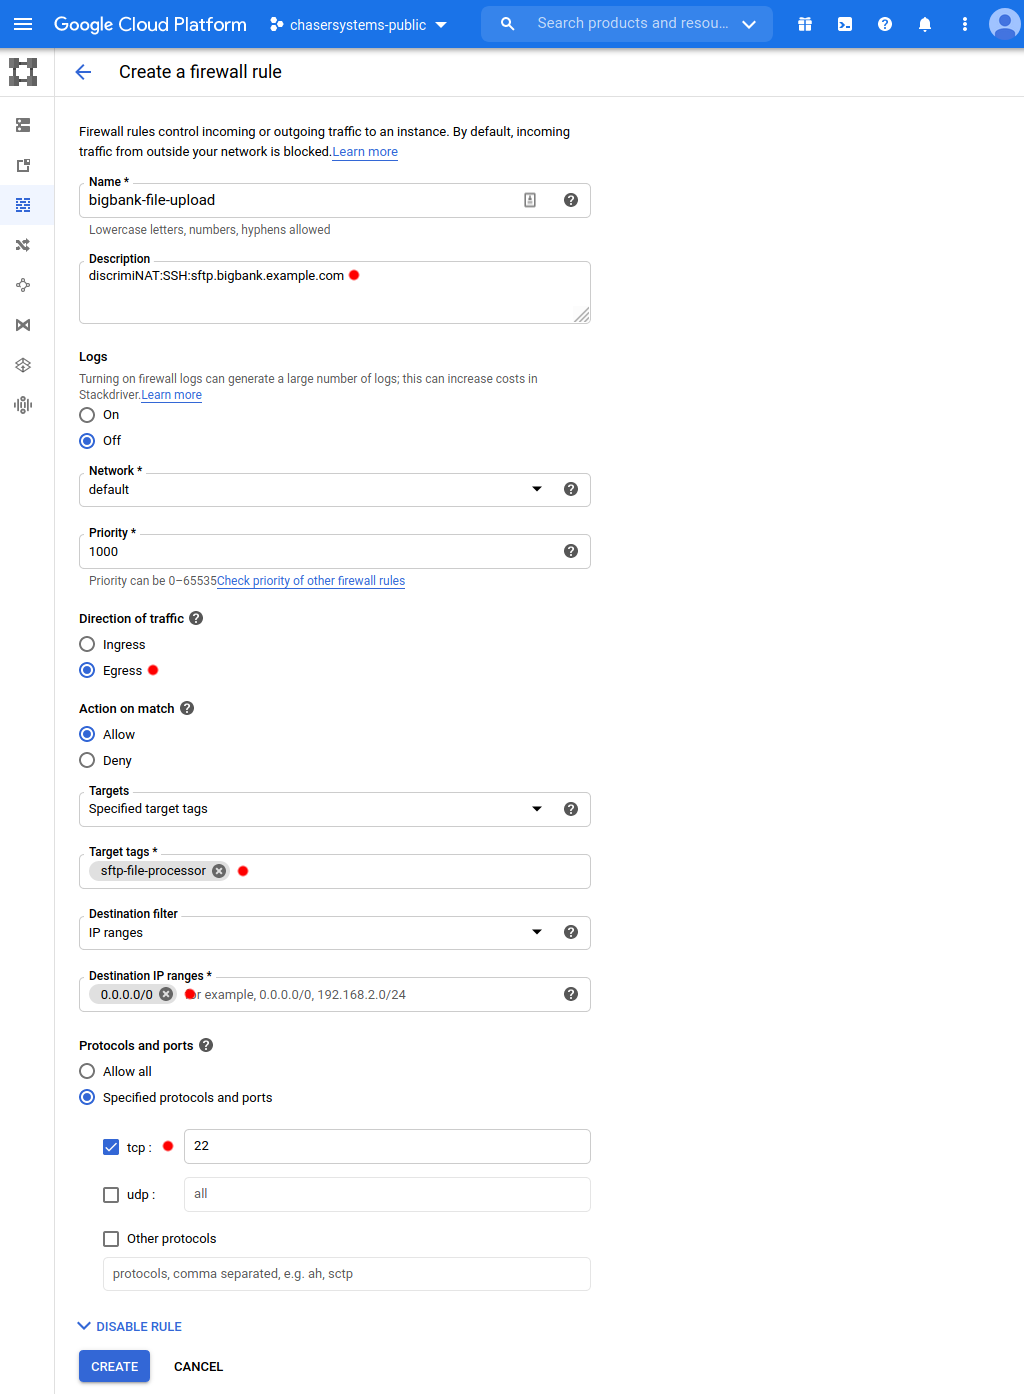
We encourage you to create firewall rules as you would normally. Tight in scope and tagged in a granular fashion so they attach with the intended applications' instances only.
FQDN based egress filtering enhancements for GCP follow!
For an effective use of the DiscrimiNAT firewall:
-
Add destination protocols and FQDNs to the description field. The format of this annotation is
DiscrimiNAT:<protocol>:<fqdn>[,<fqdn>].- Valid protocols are
sshandtlsonly. - There can be as many FQDNs as you can fit separated by commas. There cannot be whitespace, though.
- There can be other text leading and trailing this specification, separated by whitespace or newlines.
- All of it is case insensitive.
- Valid protocols are
-
Some examples of what can go in the description field:
DiscrimiNAT:TLS:api.foo.example.com,downloads.example.netDiscrimiNAT:SSH:sftp.txs.example.org,ssh.github.comdiscriminat:tls:api-v2.example.com discriminat:tls:www.example.orglorem ipsum discriminat:ssh:ssh.github.com,gitlab.com dolor sit amet-
lorem ipsum

discriminat:ssh:ssh.github.com

discriminat:ssh:gitlab.com

dolor sit amet
-
Direction of trafficmust beEgress. -
Targetsmust be set toSpecified target tags. And then specify the same network tags as on the virtual machines that you'd like this firewall rule to be applied to. Precisely like you would anyway. -
Destination filtermust be set toIP rangeand the range set to the narrowest you can think of. Now if you don't have anything narrower than0.0.0.0/0that is absolutely fine! The firewall takes care of validating the destination IP address of actual packets in many ways, but the firewall rule at the Google Cloud networking and security level must allow the packet to leave the virtual machine at all. Therefore,0.0.0.0/0is a safe choice with the DiscrimiNAT firewall in the way. -
Under
Protocols and ports, only choosetcpand specify exactly one port number. Ranges, multiple ports, other protocols, and so on are not supported.- For your typical HTTPS outbound connection, the port number would be
443. - A typical SFTP connection has the port number of
22.
- For your typical HTTPS outbound connection, the port number would be
-
That's it! Although you may want to check the full reference for more possibilities.
vi. CONFIGURATION LOG
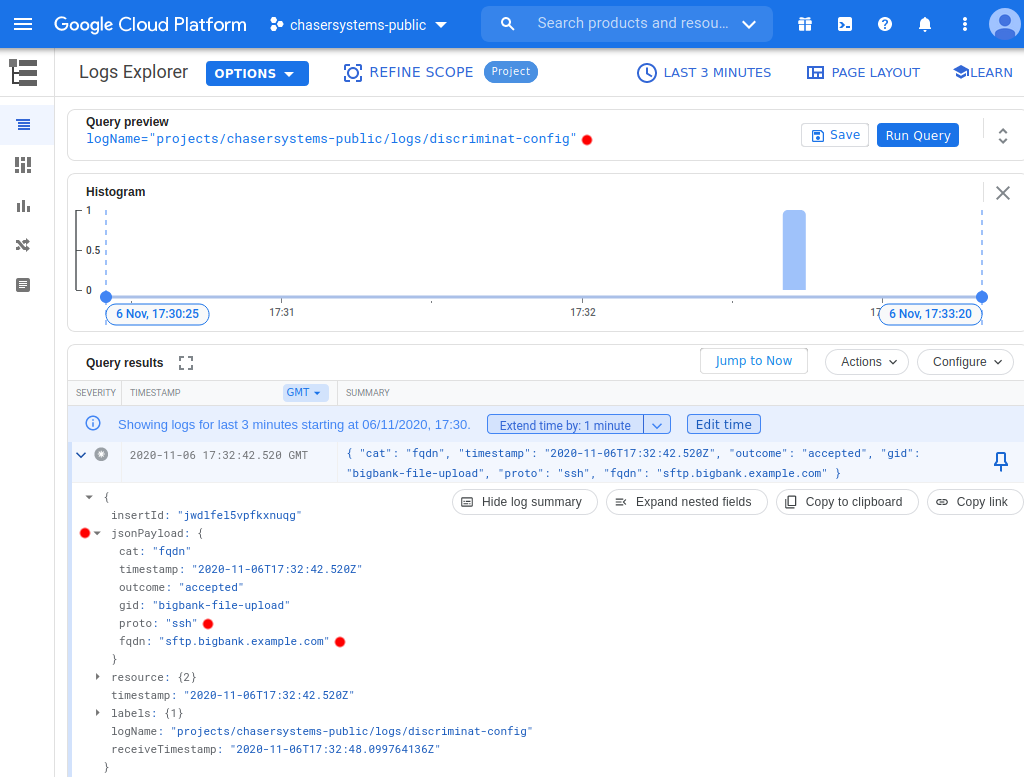
Let's now look at the configuration logs. Browse to Logging -> Logs Explorer and paste the log filter for watching the configuration logs from the deployments page, which is constructed as logName="projects/<google-cloud project name>/logs/discriminat-config" and hit Run Query. You will see each instance of the firewall pick up the changes! Logs are structured (JSON) so filtering them in any way you like should be a walk in the park!
Can't see any DiscrimiNAT logs? Have a look at our Troubleshooting section for common issues.
vii. TEST A VIRTUAL MACHINE
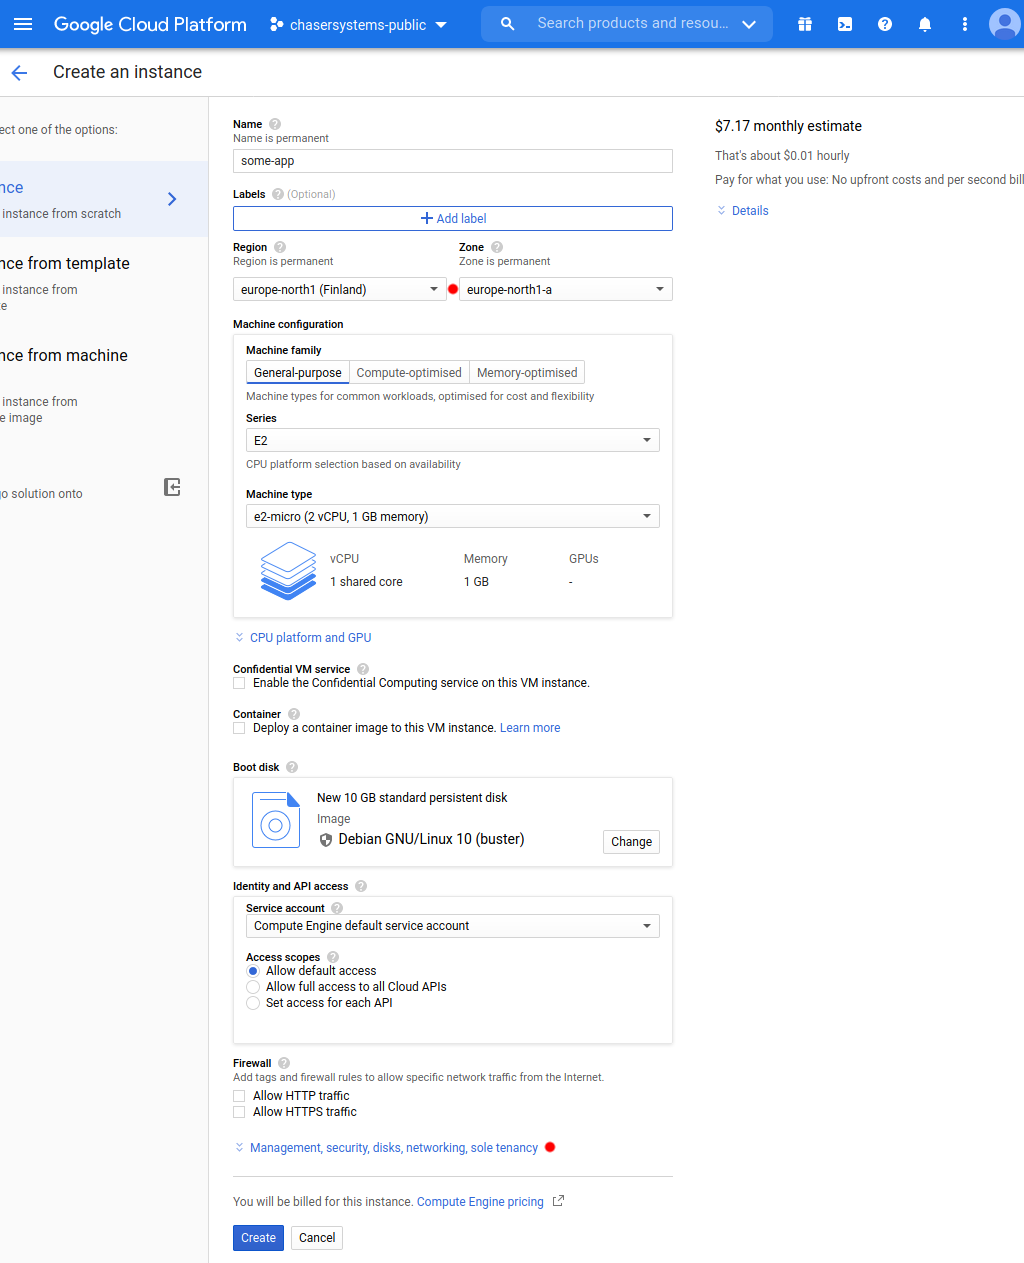
Time to test with a virtual machine. Create one as usual, in the same region as the firewall was deployed in. Customise the Management, security, disks, networking, sole tenancy section though.
Contact us for expert help at devsecops@chasersystems.com at any stage of your journey – we'll jump on a screen-sharing call right away!
viii. PRIVATE IP AND TAGS
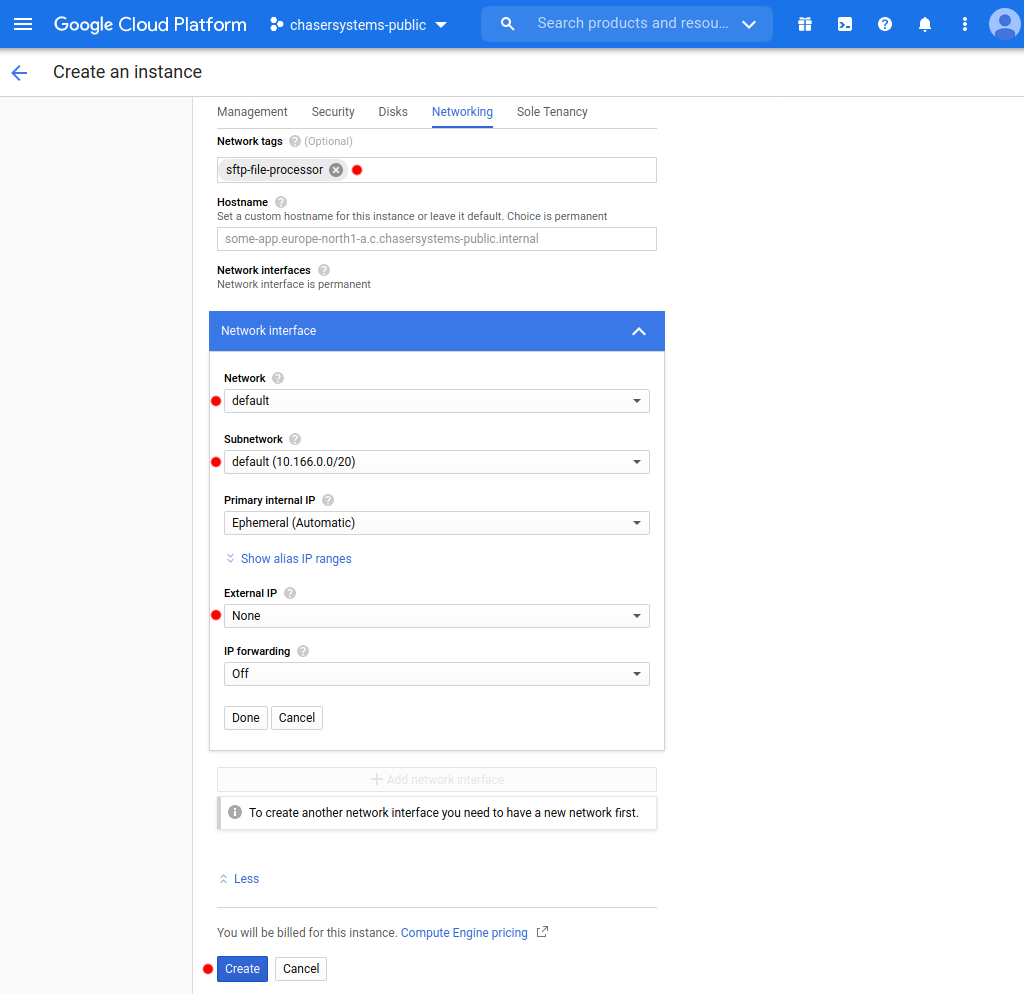
Under the Networking tab, ensure that:
Network tagsmatch any or some firewall rules with the same target tags, as usual.NetworkandSubnetworkare set to where the firewall was deployed.External IPis set toNone. These virtual machines do not need a Public IP address at all and will be NAT'ed if firewall rules permit through the DiscrimiNAT firewall.
The logs of flow activity from this virtual machine can be viewed in the Log Explorer with a filter that is constructed as logName="projects/<google-cloud project name>/logs/discriminat-flow".
ix. Next Steps
TroubleshootDiscover FQDNs